VSCode is an amazing editing tool. Thanks to its extensions, one can develop using many programming languages. However, what about analyzing a software system using VSCode? In this article, we will show you how to use VSCode with Moose to analyze Java code. We use Christopher Fuhrman’s post as an example.
Although we can perform some analysis from VSCode, using the Moose tool natively provides a better user experience. Nevertheless, we think that this might be of interest to people who only use the VSCode tool.
Download and install the required tools
To perform the analysis, we will use the insider version of VSCode. Currently, only this version supports the NoteBook feature we will use. So, as a first step, install the last VSCode insider version. We will also need a Moose image and a Pharo VM. For this blog post, we will use a Moose 8 image-based on Pharo 8.
- Download the last Moose 8 image for VSCode and extract it.
- Download the corresponding Pharo VM and extract it.
Advice: Do not take the headless version (it has not been tested)
Once you have download VSCode, Moose 8, and the Pharo VM, we will install the extension in VSCode.
- Download the extension
- Open VSCode insider
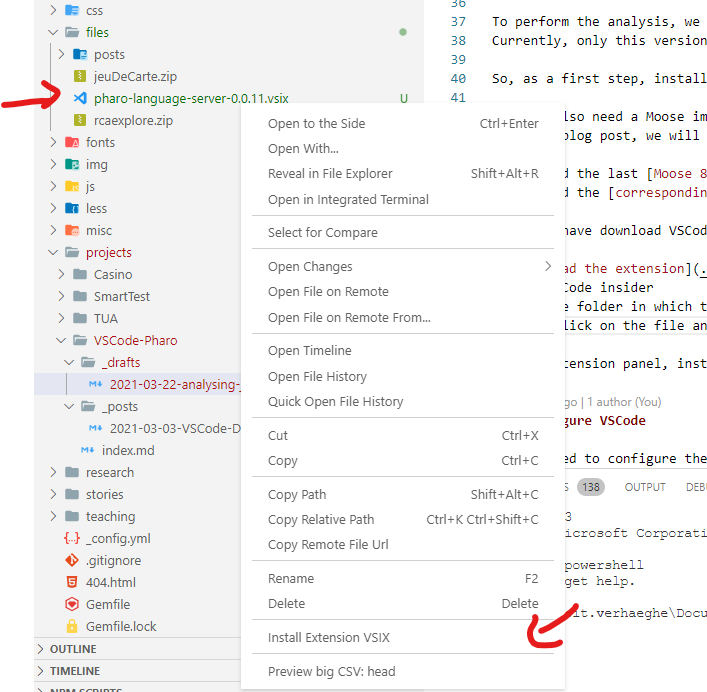
- Open the folder in which the extension file is present
- Right-click on the file and execute
Install Extension
- Close VSCode
From now on, you must start VSCode insider with the following parameters (–enable-proposed-api badetitou.pharo-language-server). It allows VSCode to use the Notebook API. Execute the following command in a terminal:
- code-insiders –enable-proposed-api badetitou.pharo-language-server
Or in Windows:
- code-insiders.cmd –enable-proposed-api badetitou.pharo-language-server
Configure VSCode
We now need to configure the Pharo Language Server extension. To do so:
- Go in the VSCode settings (
Ctrl + ,). - Search Pharo settings
- Set the field
Path To Imagewith the path to the image you have downloaded
D:\Users\benoit.verhaeghe\Documents\Pharo\images\LSP4\LSP4.image - Set the field
Path To VMwith the path to the VM you have downloaded
D:\Users\benoit.verhaeghe\Documents\Pharo\vms\80-x64\Pharo.exe - Restart VSCode (to be sure the configuration is well saved)
Advice: If you use Windows, you might need to remove all space characters in the path.
Once the configuration is done, you can create a new file named oo-analysis.moosebook. It should open as a VSCode notebook and a Pharo image (you can reduce the Pharo image, but do not close it).
Set up the analysis of a new project
In order to configure the analysis of a new project, several steps must be taken into account.
Clone the Java project you want to analyze
First, we are going to download the GitHub project we want to analyze. To do so, create a new code cell in VSCode with the following code:
javaProjectFileRef := MooseEasyUtility cloneGitHubRepo: ‘https://github.com/bethrobson/Head-First-Design-Patterns’.
This piece of code will download the project under our Pharo image folder. To execute the cell, press the run arrow next to the cell. In case of success, a little tick appears and the path to the clone project has output of the cell.

Parse the Java code to make FAMIX model
As in the original blog post of Christopher, now we will parse the Java project and create a FAMIX model. To parse the Java project, we use VerveineJ v1.x.x (v1.x.x works with Moose 8, whereas v2.x.x is under modification to work with the future Moose 9).
Contrary to the original blog post, we will download VerveineJ v1.0.2 (and not v1.0.1). It includes nice fixes.
- Create a new code cell with the following piece of code to download the last VerveineJ version and extract it
client :=ZnClient new. client signalProgress: false; url: ‘https://github.com/moosetechnology/VerveineJ/archive/v1.0.2.zip’; downloadTo:FileLocatorimageDirectory. client isSuccess ifTrue: [ ZipArchive new readFrom: (FileLocatorimageDirectory/ ‘v1.0.2.zip’) asFileReferencepathString ; extractAllTo:FileLocatorimageDirectory.“Since permissions are not preserved with ZipArchive#extractAllTo:”“This line is not required in Windows system”LibCrunCommand: ‘chmod u+x ‘, (FileLocatorimageDirectory/ ‘VerveineJ-1.0.1/verveinej.sh’) asFileReferencepathString ] ifFalse: [ Errorsignal: ‘Download failed.’ ]
- Then, we will ask
MooseEasyFamixMakerto parse the Java project using VerveineJ and create a.msefile for us. Again, in another cell, execute the following snippet of code.
wizard := MooseEasyFamixMaker
generateMSETo: 'tmp/HFDP.mse' asFileReference
parsing: 'tmp/MooseEasyRepos/bethrobson__Head-First-Design-Patterns' asFileReference
with: (FileLocator imageDirectory / 'VerveineJ-1.0.2/verveinej.bat') asFileReference.
wizard generateMSE.
.mse is a file format used by Moosetechnology to represent its model and meta-model. Other formats exist.
Load the model
The last step is to load the model in the Moose image (the one we are controlling using VSCode). In a new cell, execute:
mseFileRef := 'tmp/HFDP.mse' asFileReference. "Generated by FamixMaker"
mseStream := mseFileRef readStream.
mseStream
ifNotNil: [
mooseModel := MooseModel importFromMSEStream: mseStream.
mooseModel rootFolder:
'tmp/MooseEasyRepos/bethrobson__Head-First-Design-Patterns'.
mseStream close. ]
ifNil: [ self error:
'Could not load MSE file into Moose: ' , mseFileRef asString ].
mseStream.
mooseModel install
The output of the cell should be a MooseModel #HFDP(30946).
Congrats! You have set up everything. Now it is time to analyze the project ![]()
Analysis
To visualize Java packages using PlantUML. We first install the PlantUML connector of Pharo (PlantUMLPharoGizmo). To do so, simply create a new code cell with the installation script and execute it.
"Install PlantUMLPharo"
version := 'master'.
Metacello new
repository: 'github://fuhrmanator/PlantUMLPharoGizmo:' , version, '/src';
baseline: 'PUGizmo';
load.
Then, you can visualize the classes of a package by executing a Pharo Script.
attribute := true.
method := false.
inheritance := true.
aggregation := true.
createCheckBox := false.
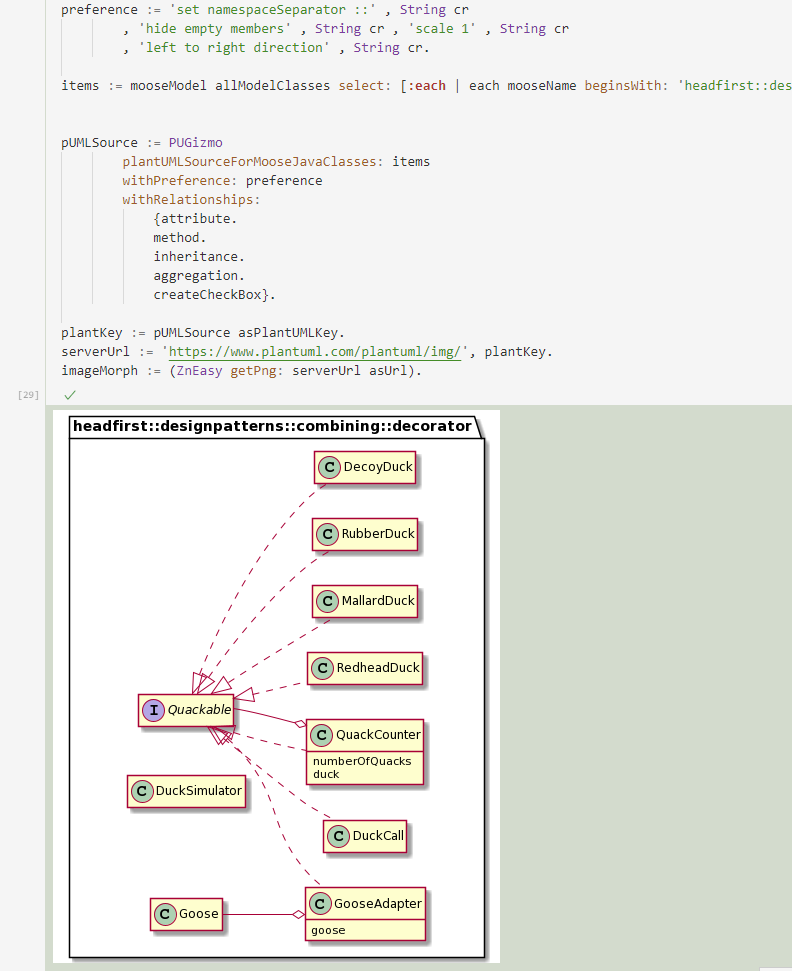
preference := 'set namespaceSeparator ::' , String cr
, 'hide empty members' , String cr , 'scale 1' , String cr
, 'left to right direction' , String cr.
items := mooseModel allModelClasses select: [:each | each mooseName beginsWith: 'headfirst::designpatterns::combining::decorator' ].
pUMLSource := PUGizmo
plantUMLSourceForMooseJavaClasses: items
withPreference: preference
withRelationships:
{attribute.
method.
inheritance.
aggregation.
createCheckBox}.
plantKey := pUMLSource asPlantUMLKey.
serverUrl := 'https://www.plantuml.com/plantuml/img/', plantKey.
imageMorph := (ZnEasy getPng: serverUrl asUrl).
In the above example, as in the original blog post, we focus on the package: headfirst::designpatterns::combining::decorator and we show the classes attributes, inheritances, and aggregation. Executing the code gives the following image as the output of the VSCode cell.
Perform a Moose analysis using Pharo
It is also possible to execute some classic Pharo code. We can request the list of classes that implement more than one interface.
"Query all classes that have more than two direct FAMIX superclasses"
classesImplementingMoreThanOneInterface := mooseModel allModelClasses
 select: [ :each |
  each directSuperclasses size > 2 ].
String streamContents: [ :stream | classesImplementingMoreThanOneInterface do: [:class | stream << class name ] separatedBy: [stream << ', ' ] ]

Visualisation with Roassal
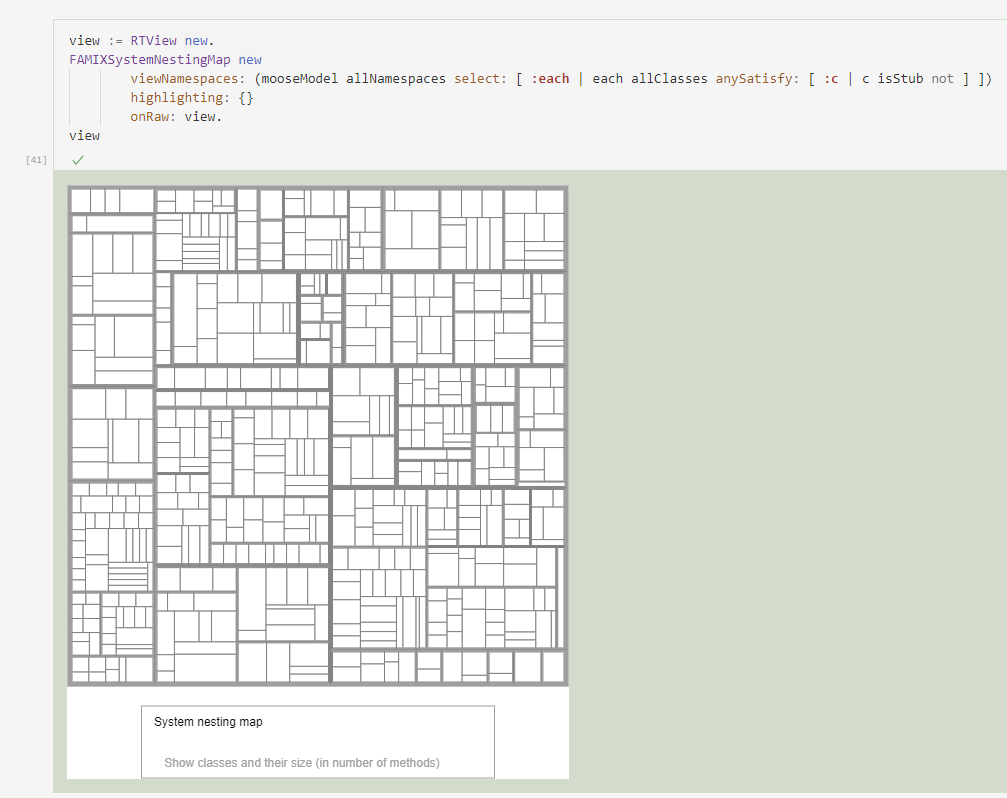
Finally, one can use Roassal2 (or Roassal3 in Pharo 9) to create custom visualization. It is possible to use pre-built visualization coming from Moose, such as the System Nesting map:
view := RTView new.
FAMIXSystemNestingMap new
  viewNamespaces: (mooseModel allNamespaces select: [ :each | each allClasses anySatisfy: [ :c | c isStub not ] ])
  highlighting: {}
  onRaw: view.
view
Or every other Roassal visualization!